
A gorgeous box of goodies that will arrive through the post!
Aimed at stitchers who have a love of making.
ALL SOLD OUT I’M AFRAID – well actually I’m delighted!
I was completely overwhelmed by the popularity of my first Workshop in a Box and just thrilled by people’s responses as they received their gorgeous packages through the post. So I’m totally excited to announce that pre-orders are will open on Friday 1st November for my second: my beautifully festive Patchwood Christmas Tree.
I LOVE the idea of you creating this lovely seasonal wall piece that you will enjoy bringing out year after year!

My aim for these boxes is for them to fall somewhere between an inspiration pack (where materials are provided with no guidance for using them) and a kit (where there are step-by-step instructions and everyone makes the same). Because of the nature of this one – it definitely falls nearer the ‘kit’ form but you will find that I have included suggestions for how you can change things around a bit and make it your own. Not least you will start off personalising it by choosing your own colours.
Please note that PAINT IS NOT INCLUDED in the box.
This was to help keep costs down (this box is already more expensive because of the sheer amount of time involved in preparation & some of the tools needed) but also because I thought you would want to choose your own colours. I use matt emulsion ‘Match Pots’ from the DIY store, available very cheaply in every colour imaginable.
You could even go metallic & glittery if you wish… just don’t tell me! Rumour has it that in December I frisk my workshop participants to make sure they’re not trying to smuggle glitter into my class!! This may or may not be true but I do have a serious ‘bling’ phobia. However even I will make an exception for this and admit that a wee bit of added shimmer might not be a bad thing! (Not included in the box though because I just can’t!)

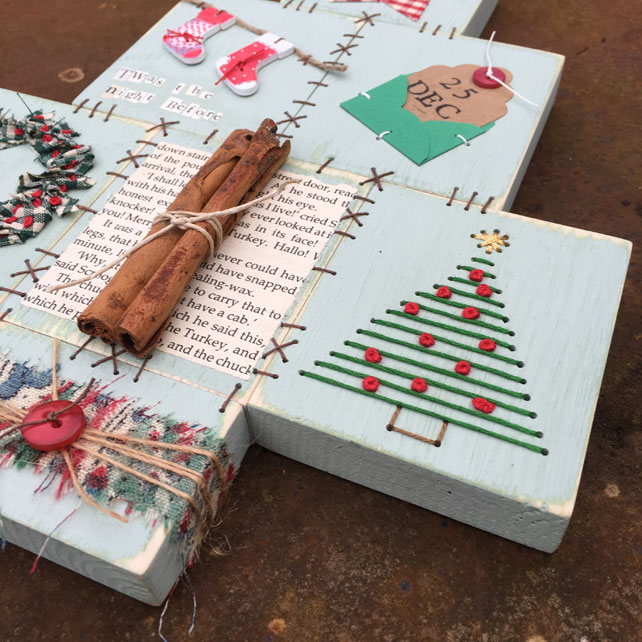
The Materials
In my own art practice the theme of my work always suggests the materials that I use. These are generally old, collected, washed & worn. I have an absolute passion for vintage materials so this project is highly unusual for me in that it mostly uses ‘new’.
Why?
Because I’ve taken my favourite patches from four years of making Patchwood Christmas Trees and brought them altogether in the design of this tree. Although I prefer to use vintage treasures wherever I possibly can, it dawned on me that my favourite Christmas Tree patches were actually made from new bits from craft stores. Yikes I never thought I would utter these words – but in this instance it’s absolutely true!
But true to form, I have managed to include some vintage treasures such as: Vintage text – an old book page, newspaper & magazine cuttings for you to cut out letters to use ‘Ransom Note’ style, vintage fabric scraps and other little bits & pieces.

I have prepared everything in the box myself, as I would for a workshop and I’m really excited at the thought of people rummaging through it! I had such wonderful feedback on the presentation of my first Workshop in a Box, this is SO important to me. My aim is to keep packaging simple and re-usable…. but also rather beautiful!

You’ll receive seven wooden ‘patches’ and all the materials and tools required to make your gorgeous Patchwood Christmas Tree with, as I said earlier, the exception of paint. I have pre-drilled all the stitching holes, ready for you to start assembling. These are done by hand and I don’t pretend for a minute that they are perfect. Participants in my workshops always think that I drill perfectly uniform holes and I am very happy to point out the wonky bits. Wood doesn’t always behave exactly as you wish and the grain means that sometimes the drill is pushed out of line. To me this is the point of it – part of the anomaly of trying to ‘sew’ wood. They are drilled as I would when working on pieces for selling or commission.
There is, of course, a story behind why I wanted to stitch wood in the first place, a bit long to tell here, but it’s to do with mixing up some of the stereotypical domestic roles – taking a traditionally ‘female’ role of sewing and working it in a traditionally ‘male’ material. My workshops are always developments from my own personal art practice – read more about my series of Patchwood Samplers.


To Order
There will be a limited number of 30 Patchwood Christmas Tree boxes available and I will start posting them out on Monday 11th November and will post throughout that week. They won’t take too long to make so there will be plenty of time for you to complete and get them hanging on your wall for Christmas.
You can pre-order a box from Friday 1st November by contacting me by email. Payment will be by Paypal or Bank transfer.
The cost of the box is £45 plus UK postage of £3.00
I can ship overseas but the following postal rates will be added:
United States £9.10/ Europe £6.65 / Australia £9.80 / New Zealand £9.80
I hope you love it and I can’t wait to see pictures of the results!